Homework 01: Neural Networks with PyTorch
PyTorch is an open source artificial neural network platform that we will make use of throughout this course. In the first part of this assignment, you will setup your PyTorch environment and work through a tutorial on how to develop code using the platform. In the second part of this assignment, you will design, implement, and train neural network architectures to solve a variety of problems. The objective of this assignment is to boostrap your knowledge of PyTorch for future explorations into biologically-inspired machine learning.
For this assignment, record your responses to the following activities in the
README.md file in the homework01 folder of your assignments GitLab
repository and push it and any code you developed by 11:59 PM Monday, September 16.
Activity 0: Branching
As discussed in class, each homework assignment must be completed in its own git branch; this will allow you to separate the work of each assignment and for you to use the merge request workflow.
First, follow these instructions to setup your git environment.
To create a homework01 branch in your local repository, follow the
instructions below:
$ cd path/to/cse-40171-fa19-assignments   # Go to assignments repository

$ git checkout master                     # Make sure we are in master branch

$ git pull --rebase                       # Make sure we are up-to-date with GitLab

$ git checkout -b homework01              # Create homework01 branch and check it out

$ cd homework01                           # Go into homework01 folder
Once these commands have been successfully performed, you are now ready to add, commit, and push any work required for this assignment.
Activity 1: Setting up Your PyTorch Environment
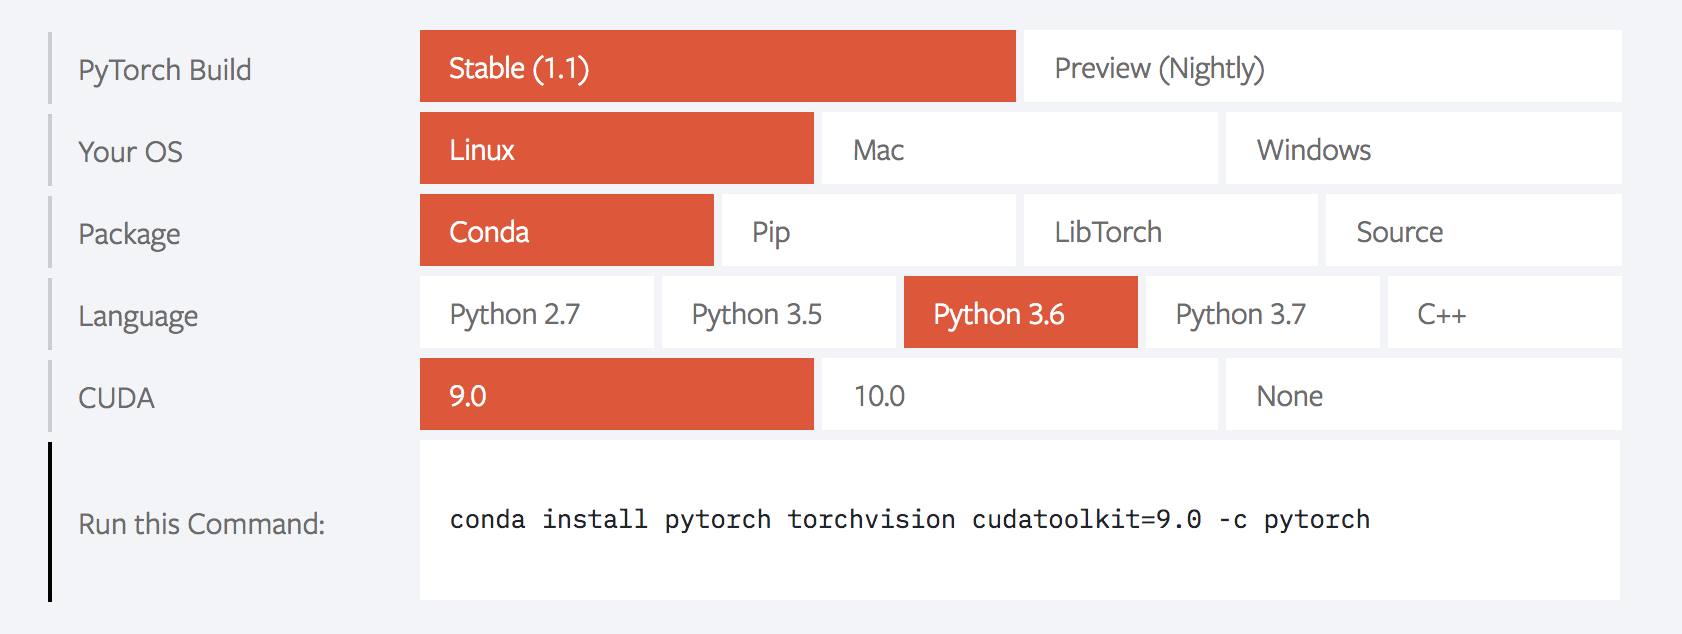
On the PyTorch project's homepage, you will find a "Quick Start Locally" guide to installing the package. Use the configuration matrix to select your operating system and dependency versions. Install the latest
Tip: do this activity as soon as possible. If you run into trouble, contact the course staff ASAP. We are available if you need help.
Activity 2: Complete the 60 Minute PyTorch Tutorial
Now that you've successfully installed PyTorch, it's time to learn how to use it. In this activity, you will complete the first four modules of the tutorial Deep Learning with PyTorch: a 60 Minute Blitz. Each module will teach you a different aspect from of the PyTorch platform, from the basic data structures and operations up through building a useful neural network architecture. (Note: there is no need to complete the data parallelism module, but if you are fortunate enough to have multiple GPUs on your system, feel free to explore it.)

Activity 3: Learn a Regression Model from Data (25 Points)
With an understanding of the basics of PyTorch, you are ready to start building and training neural network models. In this activity, you will create a simple regression model that can predict a student's grade based on the number of hours they have studied and slept the day before a test is given.
The network you implement should have two input units (the two input dimensions are hours of study time and hours of sleep, as integers between 0-9), three hidden units, and one output unit (the predicted grade on a continuous scale between 0-1). Use a sigmoid function as the non-linear activation function in the hidden units. To assist us with grading, make sure that the code you submit for this activity, and the subsequent activities, operates on CPU only.
Hint: you are free to use any available reference material on PyTorch to inform your network design, but make sure to cite any sources that you use in your solution.
The table below contains the training data you should use (scale these values as necessary). Note the trend that is present: more sleep and more study time leads to a higher grade (it's true!). This is the pattern that should be learned by the network if it is working correctly.
| Number of Study Hours | Number of Sleep Hours | Grade |
|---|---|---|
| 5 | 9 | 92 |
| 4 | 8 | 91 |
| 3 | 6 | 82 |
| 5 | 8 | 95 |
| 1 | 4 | 74 |
| 2 | 6 | 75 |
| 8 | 8 | 96 |
| 7 | 8 | 94 |
| 2 | 5 | 80 |
| 6 | 9 | 91 |
Train your network for 1,000 epochs using a mean sum squared loss function. Your training code should incrementally print the loss value as training proceeds. What is the value of the loss in the final epoch? Record this value in your README.md file as part of your answer.
Now it's time to test the network. Produce predictions of test performance based on the following sequence of study and sleep hours. Your prediction code should print each test instance out to the terminal. Record each prediction in your README.md file as part of your answer.
| Number of Study Hours | Number of Sleep Hours |
|---|---|
| 3 | 9 |
| 1 | 3 |
| 7 | 7 |
| 4 | 5 |
| 8 | 9 |
Submit your code as the final part of your answer to this question. Any instructions for running it should be included at the top of the source file in a comment.
Activity 4: Create a Network that can Learn the NAND Operator (25 Points)
Recall from computer architecture that the NAND operator is a universal operator, meaning that any other logical operator can be expressed as a combination of NAND operations. Fundamentally, this operator itself is the combination of the operators NOT and AND. An interesting task from the perspective of AI is the ability to learn such an operator through example.
The network you implement here should have two input units (the two Boolean values that are being processed by the NAND operator), two hidden units, and one output unit (the exact output of the NAND operator). Use a sigmoid function as the non-linear activation function in the hidden units. The output of your code should be the exact answer for any two input bits. Hint: since we are learning NAND from data, some post-processing may be needed on the prediction from the last layer of the network.
Your training data for this activity is the truth table for the NAND operator:
| A | B | A NAND B |
|---|---|---|
| 1 | 1 | 0 |
| 1 | 0 | 1 |
| 0 | 1 | 1 |
| 0 | 0 | 1 |
Train your network for 1,000 epochs using mean sum squared loss. Your training code should incrementally print the loss value as training proceeds. What is the value of the loss in the final epoch? Record this value in your README.md file as part of your answer.
After training, you should be able to reproduce the above truth table exactly by providing A and B as the two inputs. Your program should print both inputs and the output for all possibilities. Submit your code as the final part of your answer to this question.
Activity 5: Design an Architecture for Visual Recognition (50 Points)
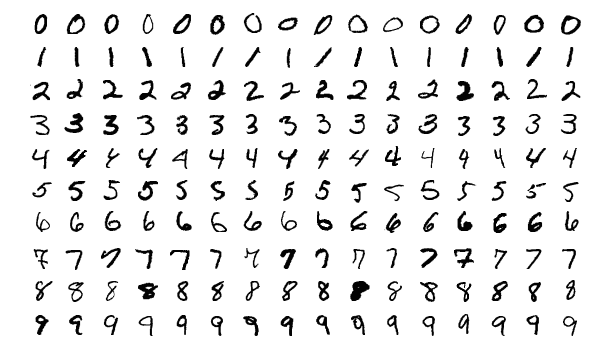
In the PyTorch tutorial you completed in Activity 2, you worked through an example of performing visual recognition on the CIFAR-10 dataset. CIFAR-10 is commonly used as a sanity check when designing a new neural network architecture. That is to say, the task and scale of data is intentionally made to be very easy to ensure that some base level of performance can be achieved. Another dataset that is commonly used for this purpose is the MNIST database of handwritten digits. Instead of classifying natural scenes, the objective of the task in this dataset is to classify images of individual handwritten digits (the original application of the dataset involved zip code recognition for the postal service). In this activity, your goal will be to create a network that can achieve a high level of accuracy on the MNIST dataset.
The MNIST dataset is conveniently accessed through PyTorch via the torchvision.datasets.MNIST subclass. After
loading the dataset, pass the training data to a classification network of your own design. To operate efficiently, you will want some mix of Conv2d and Linear layers. Make use of the relu activation function here, as it will yield good performance. The performance target for this activity is over 90% accuracy on the test set (which we will use here as a validation set, so don't worry about overfitting). Hint: you may need to normalize the images to get good performance. Train the network using the SGD optimizer. Your program should print out the loss during training, as well as the final accuracy on the test set. Submit your code as part of your answer to this question.
Hyperparameters are free parameters that can be adjusted in any way desired. They often control important aspects of the learning process, including influencing the rate of change of the elementary parameters (i.e., the weights) of the network. One such hyperparameter is the Learning Rate. Try adjusting this parameter in the SGD method via the lr variable by stepping it in log base 10 increments. What happens to the loss during training and the test accuracy as the learning rate changes? Why is this the case? Record the answers to these questions in your README.md file.
We will revisit the idea of hyperparameters and their role in learning in Homework 04.
Feedback
If you have any questions, comments, or concerns regarding the course, please
provide your feedback at the end of your README.md.
Submission
Remember to put your name in the README.md file. To submit your assignment, please commit your work to the homework01 folder
of your homework01 branch in your assignment's GitLab repository:
$ cd path/to/cse-40171-fa19-assignments   # Go to assignments repository
$ git checkout master                     # Make sure we are in master branch
$ git pull --rebase                       # Make sure we are up-to-date with GitLab
$ git checkout -b homework01              # Create homework01 branch and check it out
$ cd homework01                           # Go to homework01 directory
...
$ $EDITOR README.md                       # Edit appropriate README.md
$ git add README.md                       # Mark changes for commit
$ git commit -m "homework01: complete"    # Record changes
...
$ git push -u origin homework01           # Push branch to GitLab
Procedure for submitting your work: create a merge request by the process that is described here, but make sure to change the target branch from wscheirer/cse-40567-sp19-assignments to your personal fork's master branch so that your code is not visible to other students. Additionally, assign this merge request to our TA (sabraha2) and add wscheirer as an approver (so all class staff can track your submission).